Live resin is likely to be the most important product you make if you’re performing solvent-based cannabis extraction. Live resin products (including live resin wax, live resin vape cartridges, and others) consistently remain at the top of the concentrates category in terms of sales, and command a slightly higher price point than their non-live counterparts.
Live resin consists of cannabinoids and terpenes extracted from fresh frozen cannabis material (typically trim but also whole flower in some cases) using light hydrocarbons such as butane, hexane, or propane, or a blend of these solvents in various ratios.
The use of fresh frozen cannabis in the live resin extraction process means that the terpene profile of the extract reflects that of the living plant, which is especially appealing to cannabis connoisseurs. In contrast, the terpene profile of concentrates made from dried and cured cannabis will have changed since the time of harvest, especially if a heat-based drying process is used.
The process of making live resin requires the use of professional closed-loop extraction equipment housed in a C1D1 room. Your state might also require you to apply for a special license type to perform solvent-based extractions.
There are several possible variations to the process of making live resin depending on the final products you intend to sell. Our recommended extraction process involves starting with live sift rather than whole fresh-frozen cannabis. This innovative change from the standard procedure radically improves extraction efficiency, making it the next logical evolution in cannabis extraction as far as total system efficiency is concerned.
Step 1: Choose Appropriate Starting Material
Starting with appropriate material is key when making live resin, as it impacts your yield and the extract’s attractiveness to consumers who vaporize live resin terpenes for their flavor. You generally want trichome-heavy strains (for the highest possible yield) with attractive flavor profiles.
- If you don’t have a grow: Find the best starting material for the price.
- If you have a grow: Figure out what material is best to go to extracts vs. what would give you better margins sold as whole, dried flower. Producing “live” freeze dried cannabis gives you a best-of-both-worlds result—flavorful flower with a live terpene profile and bright colors that’s ready for market in as little as 2-3 days after harvest.
Research-based tip: Lemon, cake, and strawberry flavors were the most advertised in cannabis product listings in the U.S., according to a study published in 2024. Prioritize cannabis strains with these flavor profiles when possible (if the plants are also trichome-heavy) to maximize your live resin’s consumer appeal.
Step 2: Harvest the Plants at the Right Time
Harvesting your cannabis plants at the right time requires finding the “sweet spot” in terms of both flavor and yield. This varies by strain and more importantly phenotype, and requires a bit of trial and error to find.
If you let the plant over-mature, it brings the terpene profile down a bit. If you harvest too early, you have less resin mass and thus less profit. Certain phenotypes need to be harvested at specific times for maximum flavor.
It’s not always just a matter of looking for amber-colored trichomes—you need to experiment and find exactly the right point at which to harvest each cultivar.
Step 3: Freeze Your Freshly Harvested Cannabis
Freeze your harvested cannabis immediately after harvest to prevent the terpenes from degrading (as they do with a traditional drying and curing process). This step is a race against the clock as you need to do everything possible to minimize dwell time.
Cut off the fan leaves and remove the flowers from the stalks. Then freeze the buds upright in turkey bags (tied off with ties or clips) at 0°F or below. You can store them in a freezer for anywhere from 24 hours to a year or two with negligible terpene loss if they are sealed correctly and out of direct light.
Tip: You can theoretically use frozen cannabis to make live resin multiple years after it was harvested if it has been processed and stored correctly. However, a maximum storage time of up to two years is best practice.
Step 4: Cryo-Sift the Fresh Frozen Flower
Sifting your fresh frozen cannabis at sub-zero temperatures prior to the extraction process is an innovative step that makes a huge difference in extraction efficiency. The side-by-side runs described in our Biomass Reduction and Hydrocarbon Extraction white paper show a 7.48% increase in total yield with 80% less butane and an 85% reduction in labor hours using what we’ve dubbed “Nitro sift™” for hydrocarbon extraction compared to standard fresh frozen plants.
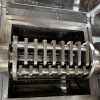
To sift your fresh frozen biomass, place the frozen buds in The Original Resinator XLS Pro using the 400µm screen for biomass reduction. Run a cycle with liquid nitrogen to sift the trichomes at ultra-cold temperatures of -150°F for 15 minutes. Your Nitro sift is now ready to blast!
Step 5: Perform Live Resin Extraction
Now you will run a standard live resin extraction process. Be sure to use professional-grade closed-loop extraction equipment and a licensed C1D1 room for these steps:
- Blend the solvents in your preferred ratio. Solvents can be blended in equal amounts or you can go heavier on the butane, propane, or hexane. Most places simply use pure butane.
- Pre-chill the solvents to -40°F to -76°F (-40°C to -60°C). It needs to be super cold for best results. A lower temperature results in greater selectivity during extraction and a higher-quality concentrate. Insulating your extraction equipment with jackets is a great way to keep your biomass and solvents cold and prevent the need for in-line dewaxing and winterization.
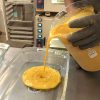
- Extract the live resin. Pack the frozen live sift into the extraction column directly from the Resinator XLS Pro. Run the pre-chilled solvent (or solvent blend) through the frozen live sift. The hydrocarbon(s) will dissolve the cannabis resin and pass through to the collection vessel as a gold or amber-colored solution.
- Vacuum-purge the live resin. Purge the residual solvent under vacuum pressure at a low temperature of 68°F to 72°F (roughly room temperature) to preserve the terpenes. A closed-loop extraction system will facilitate solvent recovery during this step. If you want to make THCA, separate the crystalline THCA from the terpenes first. Then vacuum-purge the terpene sauce.
Step 6: Post-Processing
You can process your live resin extract further with homogenization, whipping, separating, and/or centrifuging to create a wide range of live cannabis concentrates, including:
- Live resin dabs
- Wax
- Pull-and-snap
- Badder and budder
- Sugar
- Caviar
- Live resin cartridges
- Diamonds and sauce
Step 7: Lab Testing, Packaging, & Distribution
Now you can lab-test, gram out, package, and distribute your live resin cannabis extracts to dispensaries. It’s preferable to transport and store the packaged product in fridges or cool rooms to ensure your live resin remains fresh (and flavorful) until it is sold and consumed.
Extract Live Resin Faster With Nitro Sift
Learning how to make live resin is both an art and a science. It takes the right SOP as well as extensive practice to create a high-quality product consistently and with the lowest possible expenditure on solvents and manpower.
Whichever live resin extraction methods you try in your lab, you will see a significant increase in efficiency with pre-sifted frozen cannabis plant material using a Resinator XLS Pro and liquid nitrogen. Contact us to cut your live resin extraction process costs with the XLS Pro today!
